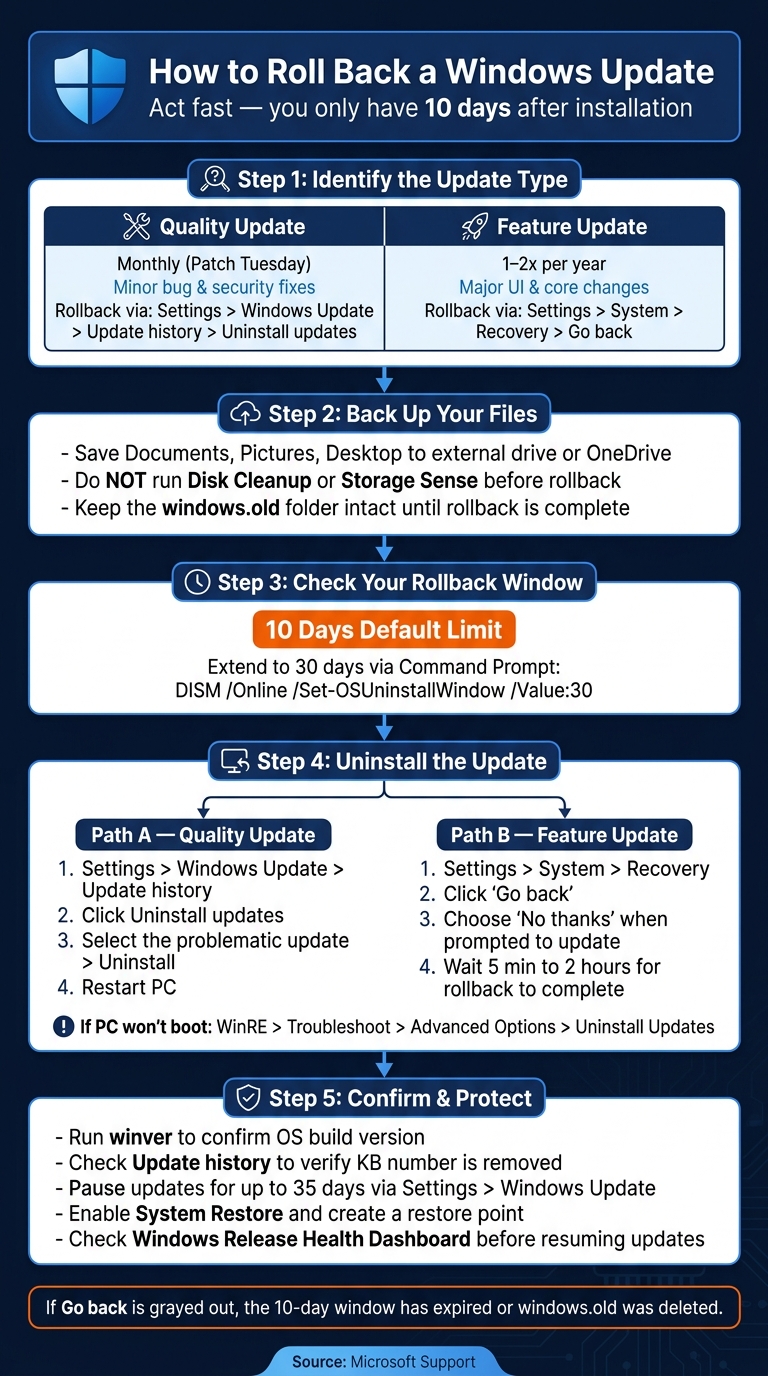
If a Windows update is causing problems, you can roll back to a previous version, but you only have 10 days after installation to do so. Here’s a quick overview of the process:
- Identify the update type: Monthly Quality Updates are minor fixes, while Feature Updates are major changes. Each has a different rollback method.
- Back up your data: Although rollbacks usually keep your files intact, it’s safer to save important documents before starting.
- Uninstall the update: Use Settings > Windows Update > Update history to remove Quality Updates or the Go back option under Recovery for Feature Updates.
- Check rollback availability: If the rollback option is grayed out, the 10-day window may have expired, or critical system files like
windows.oldmay have been deleted. - Restart and test: After rolling back, verify that the issue is resolved and pause updates to avoid reinstalling the problematic one.
If your PC won’t boot, access the Windows Recovery Environment (WinRE) to uninstall updates. For advanced users, PowerShell or System Restore can also help manage updates.
Act quickly to avoid losing the rollback option, and always prepare for future issues by enabling System Restore and creating backups.
How to Roll Back a Windows Update: Step-by-Step
How to Roll Back Windows Updates (Windows 10 & 11)
sbb-itb-dc5b06c
Before You Roll Back: What to Do First
Before diving into a rollback, there are a few key steps to cover.
Check Your Windows Version and Update Type
Rollback methods differ based on the type of update you're dealing with. Here's a quick breakdown of update types and their corresponding rollback paths:
| Update Type | Frequency | Impact | Rollback Path |
|---|---|---|---|
| Quality Update | Monthly (Patch Tuesday) | Minor; addresses bugs and security issues | Settings > Windows Update > Update history > Uninstall updates |
| Feature Update | 1–2x per year | Significant; includes UI and core feature changes | Settings > System > Recovery > Go back |
You can view all installed updates by navigating to Settings > Windows Update > Update history. This section will display a detailed list of updates along with their installation dates.
Once you’ve identified the update in question, it’s time to safeguard your data.
Back Up Your Files
Although most rollback processes are designed to preserve personal files, there’s no absolute guarantee. To stay on the safe side, back up essential folders like Documents, Pictures, and Desktop to an external drive or a cloud service such as OneDrive.
It’s also important to avoid using tools like Disk Cleanup or Storage Sense before completing the rollback. These utilities can delete the windows.old folder, which is critical for reverting to the previous Windows version. Keep that folder intact until the rollback is finished and your system is stable.
Once your data is secure, check how much time you have left to initiate the rollback.
Know the Rollback Time Limits
The rollback option isn’t available indefinitely. According to Microsoft Support:
"The option to go back to your previous version of Windows is only available for a limited time after upgrading. In most cases, you have 10 days to go back."
After this 10-day window, Windows automatically deletes old system files, making the rollback option unavailable. If the "Go back" button is grayed out or missing, it’s likely because the rollback period has expired.
For advanced users who want more flexibility, the rollback window can be extended to 30 days. To do this, run the following command in an elevated Command Prompt:
DISM /Online /Set-OSUninstallWindow /Value:30.
Make sure to confirm your rollback window before moving on to the uninstallation steps.
How to Roll Back Quality Updates
Once you've completed your pre-rollback checklist, follow these steps to reverse quality updates.
Monthly quality updates aim to fix bugs and security vulnerabilities but can sometimes introduce new problems like printing errors, network connectivity issues, or app crashes. A notable example occurred in March 2021 when Microsoft's updates KB5000802 and KB5000808 disrupted printing in many production environments. System administrators had to manually uninstall these patches to restore functionality.
"If a Windows update breaks printing, networking, or application compatibility, you may need to roll back the update quickly." - Brock Bingham, Systems Administrator, PDQ
Uninstall Updates in Windows 11
- Open Settings by pressing Windows + I and navigate to Windows Update in the left-hand menu.
- Select Update history, scroll to the "Related settings" section, and click Uninstall updates.
- Locate the update that corresponds to when the issue began.
- Click Uninstall, confirm, and then choose Restart Now to complete the process.
Uninstall Updates in Windows 10
- Go to Settings > Update & Security > Windows Update, then click View update history and Uninstall updates.
- This action will open the older Control Panel interface.
- Find the problematic update, right-click it, and select Uninstall.
Once the update has been removed, proceed with the final steps to confirm the issue is resolved.
Note: Microsoft officially ended free security updates and technical support for Windows 10 as of October 14, 2025. While rollback features still function on existing installations, keep this in mind when troubleshooting.
Restart and Test for Resolution
After uninstalling the update, restart your PC to apply the changes. Once your system reboots, test the affected functionality to see if the issue has been resolved. If multiple updates were installed around the same time, remove them one by one, restarting after each removal, to pinpoint the problematic update. To confirm an update has been successfully removed, revisit the Uninstall updates section and verify that the relevant KB number no longer appears. This ensures stability is restored and helps identify any further troubleshooting steps you might need.
How to Roll Back Feature Updates
Feature updates - those big annual or semi-annual releases that change how Windows looks and works - can sometimes create problems. Luckily, you have a 10-day window after installation to roll back to your previous version of Windows. Here’s how to safely undo a feature update in Windows 11 or Windows 10.
Using the Go Back Option in Windows 11
Windows 11 offers a built-in rollback option, but it’s only available for 10 days after the update is installed. To access it, go to Settings > System > Recovery (or Windows Update > Update history > Recovery) and click the Go back button. When prompted to check for updates before proceeding, choose "No, thanks" to move forward.
While your personal files will stay intact, keep in mind that any apps, drivers, system settings, or new user accounts created after the update will be removed. If you’ve added new user accounts, delete them before starting the rollback. The process can take anywhere from a few minutes to two hours.
Using the Go Back Option in Windows 10
In Windows 10, open Settings > Update & Security > Recovery, then click Get started under the "Go back to the previous version of Windows 10" section. This option only works if the windows.old and $windows.~bt folders are still on your system drive. Make sure you have your previous Windows sign-in password and any USB drive used during the upgrade ready, as they may be required.
Rolling Back When Your PC Won’t Boot
If the feature update causes issues like a boot loop or blue screen, you may not be able to access Settings. In this case, you’ll need to force your PC into the Windows Recovery Environment (WinRE). To do this, interrupt the boot process three times in a row - turn off your PC using the power supply switch on the back as soon as the loading circle appears. On the fourth attempt, let the system boot normally to trigger WinRE. (Using the front power button might not cut power fast enough to activate recovery mode.)
Once in WinRE, follow these steps to roll back the update: go to Troubleshoot > Advanced options > Uninstall Updates, and then select Uninstall Latest Feature Update. The rollback usually takes 5 to 10 minutes but could take longer for larger updates. Be prepared with your BitLocker recovery key if prompted. If the rollback option doesn’t work, you may need to consider a System Restore or a factory reset.
Advanced Rollback Methods
If the Settings app doesn’t meet your needs or you’re managing updates in bulk, these advanced methods offer more precise control to handle specific updates.
Uninstall Updates via Control Panel
The classic Control Panel is still functional in both Windows 10 and Windows 11. To use it, open Control Panel, navigate to Programs > Uninstall a program, and click View installed updates in the left-hand menu. Here, you can locate the update by its KB number, select it, and click Uninstall.
"The Control Panel method provides a more comprehensive update list, especially when the Settings app omits certain updates." - Brock Bingham, Systems Administrator
Follow the prompts to confirm the uninstallation. If required, restart your system to complete the process.
Remove Updates Using PowerShell
PowerShell is a powerful tool for IT professionals who need to remove updates efficiently or manage multiple devices simultaneously. To get started, open PowerShell as Administrator. Use the Get-HotFix command to list all installed updates, and then execute wusa /uninstall /kb:XXXXXXX (substitute XXXXXXX with the KB number) to remove the desired update.
For bulk removal across a network, you can install the PSWindowsUpdate module and run Remove-WindowsUpdate -KBArticleID KB5048667 -Confirm:$false. If an update doesn’t show up in standard lists, you can use the Remove-WindowsPackage command via DISM. Keep in mind, however, that the /quiet parameter has been disabled since Windows 10 version 1507.
Before proceeding, verify whether the update is a Servicing Stack Update (SSU). Microsoft explains, "SSUs cannot be uninstalled once installed, because they are essential system components". Any attempt to remove one will fail.
If these command-line approaches don’t resolve the issue, consider using System Restore as a last resort.
Revert the System Using System Restore
System Restore is a reliable fallback when a troublesome update cannot be removed through other methods. To use it, search for "Recovery" in the taskbar, open System Restore, choose a restore point from before the update was installed, and follow the steps to revert your system.
Keep in mind that System Restore won’t affect your personal files - like documents, photos, or emails - but it will reverse changes to apps and drivers made after the selected restore point. Note that System Restore must have been enabled beforehand, and restore points must already exist. If it’s not currently enabled, it’s a good idea to turn it on now to prepare for future issues.
These advanced techniques provide additional tools to maintain system stability when standard rollback options fall short.
After the Rollback: Next Steps and How to Avoid Future Problems
Confirm the Rollback Worked
After restarting your system, press Win + R, type winver, and check that the OS build matches the version you expected. Then, go to Settings > Windows Update > Update history > Uninstall updates to ensure the problematic KB update is no longer listed.
Keep an eye on your system for the next 48 hours. If the issues that led to the rollback - like BSODs, app crashes, or hardware malfunctions - are resolved, you can be confident the rollback was successful. To avoid accidentally reinstalling the same update, make sure to pause updates immediately.
Pause or Delay Future Updates
Use Settings > Windows Update to pause updates for at least a week (or up to 35 days). This gives Microsoft time to address any bugs before the update reappears. During this pause, set Active Hours to prevent unexpected restarts while you're working.
For those using Windows 11 Pro or Enterprise, you can take it a step further by using the Local Group Policy Editor (gpedit.msc). Navigate to Computer Configuration > Administrative Templates > Windows Components > Windows Update > Manage end user experience and disable automatic updates. This setting ensures updates only install when you manually trigger them.
"Uninstalling an update doesn't always mean you're done. If you don't pause or block the update, Windows Update may simply reinstall it during the next scan cycle." - Brock Bingham, Systems Administrator, PDQ
Once you've paused updates, take proactive steps to prepare for any future issues.
Get Ready for Future Issues
Now is the perfect time to prepare for potential problems down the road. Setting up restore points and backups now can save you from headaches later. Start by enabling System Restore, which is often disabled by default in Windows 11. Search for "Create a restore point" in the Start menu, select your system drive, click Configure, and turn on system protection. From then on, create a manual restore point before installing major updates.
For added protection, use the System Image Backup tool in the Control Panel (under Backup and Restore) to create a complete OS image on an external drive. This method captures your entire system state, not just your files. Additionally, prepare a bootable USB drive using the Windows Media Creation Tool in case your PC becomes unbootable.
Before resuming updates, check the official Windows release health dashboard for known issues that could affect your system. For example, the April 2026 update (KB5083769) reportedly caused BitLocker recovery issues for some users. Staying informed about such warnings can help you avoid repeating the rollback process.
Conclusion
A rollback must be done promptly since the option is only available for 10 days after a feature update is installed. If you encounter problems, check your recovery options without delay.
It's always wise to back up your data before any major updates. While personal files usually remain intact, apps and settings added after the update might not survive the rollback.
Understanding the type of update causing the issue is key to choosing the right rollback method. Quality updates and feature updates each require a different process. If your PC won’t boot, you can use WinRE (Windows Recovery Environment) to access Troubleshoot > Advanced options > Uninstall Updates. Identifying the update type and following the correct steps ensures a smoother recovery process.
"Rolling back a Windows 10 update can feel like hitting the undo button on a glitchy software mistake." - Matt Jacobs, IT Consultant
Once the rollback is complete, pause automatic updates to avoid reinstalling the problematic update immediately. These steps help keep your system stable and ready for future updates.
FAQs
Will rolling back delete my files?
When you roll back a Windows update, your personal files remain untouched. The process simply reverts your system to how it was before the update. However, any apps that were installed, removed, or updated after the update might not function properly or could disappear altogether. Typically, this rollback option is available for up to 10 days after the upgrade, giving you a chance to address any issues without risking your data.
Why is the Go back option grayed out?
If the "Go back" option is grayed out, it’s likely because the system no longer has the necessary files for a rollback or the feature isn’t available. This can happen for a few reasons:
- The rollback period (typically 10 days after installation) has expired.
- The update was installed using a method that doesn’t support rollback.
- Files for the previous version were deleted during a reset or upgrade.
Without these files, the system can't revert to the earlier version.
How do I rollback if Windows won’t boot?
If your Windows PC refuses to boot after an update, you can use the Windows Recovery Environment (WinRE) to undo the changes. Here’s how to access it:
- Restart your computer and press F8 repeatedly during startup.
- Alternatively, force a shutdown during boot three times in a row. This will automatically trigger WinRE.
Once in WinRE, navigate to Troubleshoot > Advanced options. From there, you can choose Uninstall Updates to remove the problematic update or use System Restore to revert your system to an earlier state.