Is your Windows PC running out of space? A cluttered drive can slow down performance, block updates, and even cause system issues. Here are 7 effective ways to reclaim storage on your Windows device:
- Run Disk Cleanup: Quickly remove temporary files, old updates, and more.
- Uninstall Unused Apps: Delete rarely used programs via Settings.
- Delete Temporary Files: Clear system and browser cache manually.
- Enable Storage Sense: Automate cleanup tasks like removing temp files.
- Disable Hibernation: Free up space by turning off this power-saving feature.
- Remove Duplicate Files: Use tools to delete redundant files.
- Move Large Files to External Storage: Relocate videos, games, or media to free up significant space.
Each method has its own benefits and risks, but combining a few can help you maximize your storage without advanced technical skills. Whether you prefer manual steps or automated tools, these tips can help keep your system running smoothly.
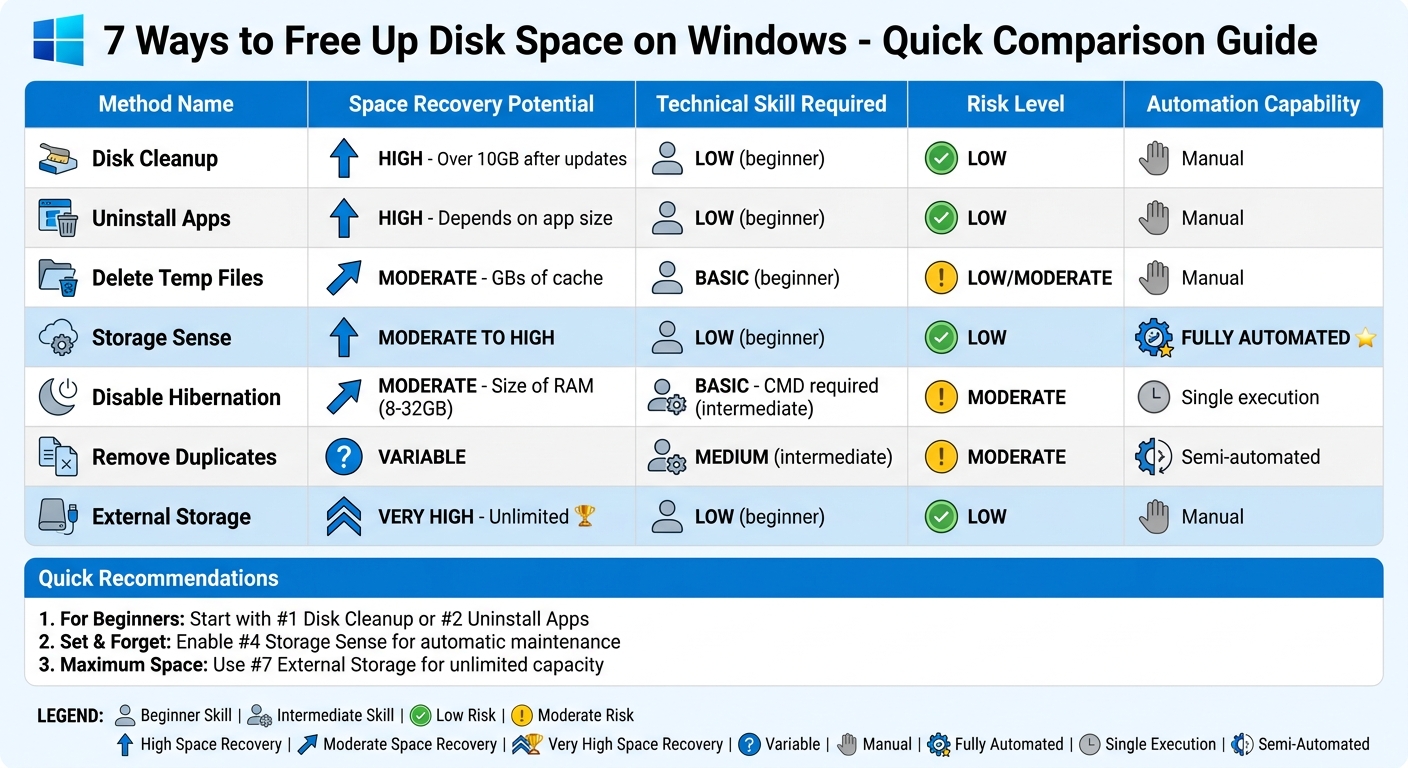
7 Windows Disk Space Methods Comparison: Recovery Potential, Skill Level, and Automation
How to FREE UP Disk Space on Windows 10 or 11 PC (49 Gbs or More!)
sbb-itb-dc5b06c
1. Run Windows Disk Cleanup
Windows Disk Cleanup is a quick and effective way to clear out temporary files, old updates, and other unnecessary clutter from your system. To access it, just type "Disk Cleanup" in the Start menu search bar or right-click your C: drive in File Explorer, select "Properties", and then click the "Disk Cleanup" button.
Once the tool is open, choose the drive you want to clean and check the boxes for file types like Temporary Internet Files, Downloaded Program Files, and Thumbnails. If you're looking for a more thorough cleanup, click on "Clean up system files." This will unlock additional options, such as Windows Update Cleanup and Windows Upgrade Log Files. Recently upgraded? Removing Previous Windows installation(s) can free up a lot of space - just remember that doing so eliminates the option to roll back to the previous version.
"The classic 'Disk Cleanup' tool built into Windows is still the quickest way to free up space." - Chris Hoffman, Tech Journalist
Space Recovery Potential
Disk Cleanup can recover several gigabytes of storage, especially after major system updates. In some cases, you might reclaim more than 10GB with just a few clicks. The tool also includes a "More Options" tab, where you can delete all but the latest system restore point. This can free up even more space, as Windows typically reserves around 15% of your drive for restore points.
Technical Skill Required
Low. Disk Cleanup is user-friendly, offering clear descriptions for each file type. Simply select the items you want to delete, confirm by clicking "OK", and then choose "Delete Files."
Risk Level
Low to moderate. Most of the data targeted by Disk Cleanup is unnecessary, making it safe for the average user. However, be careful when deleting system restore points or Previous Windows installation(s), as these actions are irreversible and could limit your ability to recover your system if needed. Always double-check descriptions for each file type - some, like the Downloads folder, might contain personal files you want to keep.
Automation Capability
None. Disk Cleanup is a manual tool, so you'll need to run it yourself. If you're looking for an automated solution, stay tuned for the section on Storage Sense.
Next up: Uninstalling unused applications to free up even more disk space.
2. Uninstall Unused Applications
Over time, your Windows PC tends to accumulate software you rarely use - think one-time games, expired trials, or pre-installed bloatware. These programs can quietly take up a lot of disk space. To locate them, head to Settings > Apps > Installed apps (or Apps & features on Windows 10). From there, use the Sort by dropdown and select Size to quickly identify the largest offenders.
If you're using Windows 11, there's an even easier way. Go to Settings > System > Storage > Cleanup recommendations. This handy feature automatically identifies unused apps and shows how much space you could free up. Once you've pinpointed the culprits, you can uninstall them directly from Settings or the Start menu.
Space Recovery Potential
The potential here is significant. Apps can range from a few megabytes to several gigabytes, so sorting by size makes it easier to tackle the biggest space hogs. Just keep in mind, the size column isn't always 100% accurate. For a deeper dive into what's taking up space, tools like WinDirStat can provide a more detailed breakdown.
Technical Skill Required
Uninstalling apps through Settings or the Start menu is pretty straightforward, so the technical barrier is low. However, this method often leaves behind remnants like folders or registry entries. If you want to clean these up, you'll need a bit more technical know-how. Alternatively, third-party tools like Revo Uninstaller or IObit Uninstaller can handle this for you, making the process easier.
Risk Level
Using the built-in uninstallation options in Windows is generally safe. Problems arise if you decide to manually delete registry entries - one small mistake can destabilize your system. Software developer Chifundo Kasiya emphasizes:
"Be cautious when making changes to the registry; any mistakes could make Windows unusable".
To reduce this risk, many third-party uninstallers create system restore points before removing programs, giving you a safety net if something goes wrong.
Automation Capability
Windows does offer partial automation. Features like Storage Sense and Cleanup recommendations can identify unused apps, but you'll still need to confirm each removal manually. For full automation, tools like Ashampoo Uninstaller (priced around $25) can monitor installations and ensure all related files are removed when you uninstall.
Up next, explore how manually clearing temporary files can free up even more space.
3. Delete Temporary Files Manually
Windows stores temporary files in two main locations: the user temporary folder (access it by typing %temp% into the Run box using Win + R) and the system temporary folder (type temp into the same Run box). These folders collect cached data from apps and system processes. To clear them, open the folders, press Ctrl + A to select all files, delete them, and click "Skip" for any files that are locked or in use.
For browser caches, you’ll need to clear them through each browser’s settings. For example, in Chrome, you can navigate to chrome://settings/content to manage cache deletion automatically.
Space Recovery Potential
Clearing temporary files can free up a surprising amount of space. In one example, removing temporary files and system data manually recovered up to 17.5 GB. Additionally, using Windows Update Cleanup released about 3.2 GB. Browser caches can also grow to several gigabytes, making them another effective target for freeing up storage.
Technical Skill Required
This method is straightforward and requires basic Windows knowledge, like using File Explorer and the Run command. If you decide to explore hidden folders like AppData, you’ll need a bit more familiarity with system directories. For quicker results, you can use Shift + Delete to permanently remove files without sending them to the Recycle Bin.
Risk Level
The risk involved is minimal because Windows won’t let you delete files that are currently in use. However, exercise caution when dealing with Windows Update Cleanup files or the Windows.old folder (available for 10 days after a major system upgrade). Deleting these will prevent you from rolling back to a previous Windows version.
Automation Capability
While this guide focuses on manual cleanup, there are automated options available. Windows’ Storage Sense can handle this task for you, or you can configure your browser to clear caches automatically when it closes. For a custom solution, you can create a batch file with the command rd %temp% /s /q to clear the temp directory. Just remember to empty your Recycle Bin afterward to fully reclaim the space. Next, check out how Storage Sense can simplify this process even further.
4. Enable Storage Sense
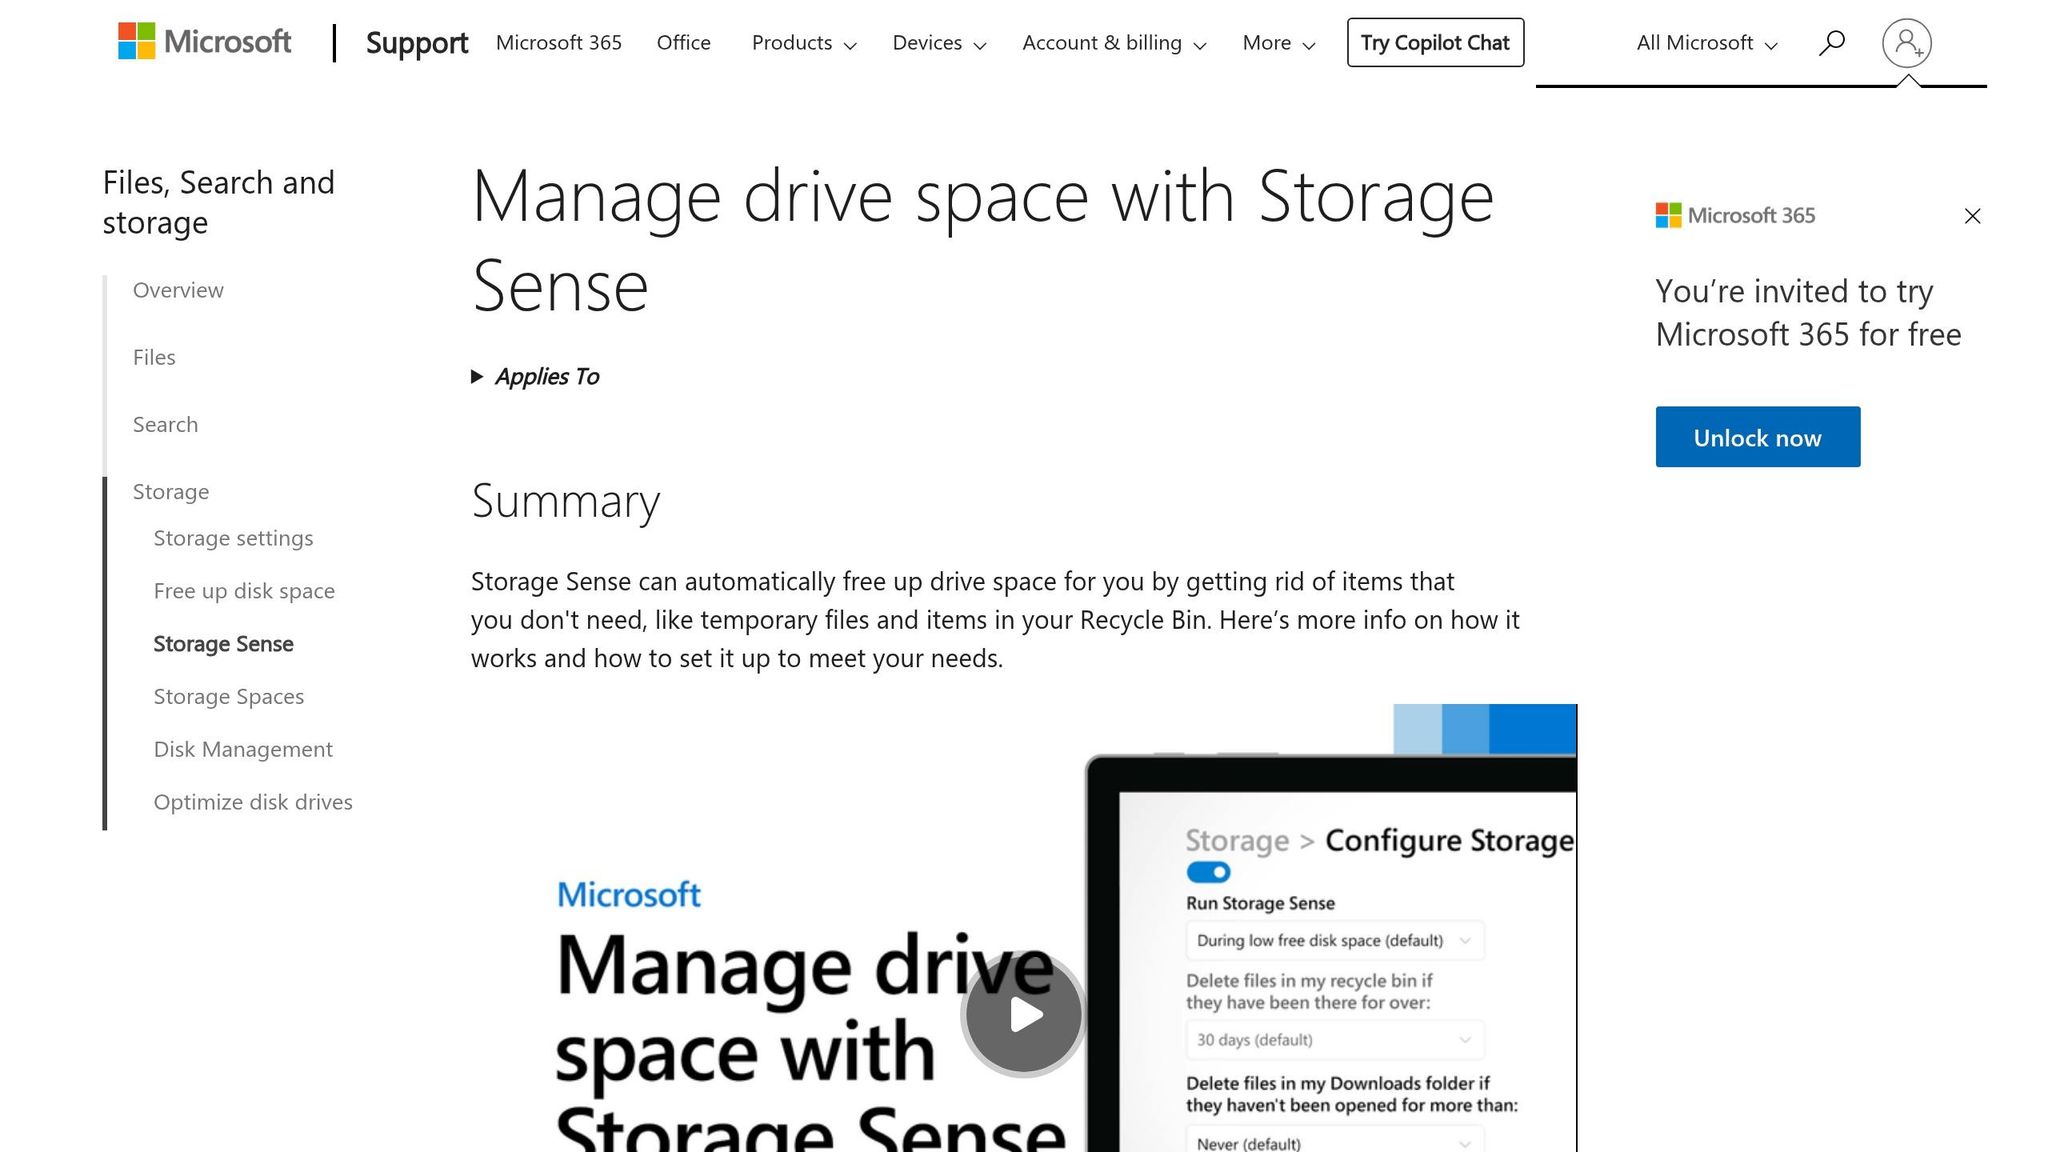
Storage Sense is Windows' built-in tool for cleaning up disk space. It automatically handles tasks like removing temporary files, emptying the Recycle Bin, and managing cloud storage. To turn it on, navigate to Start > Settings > System > Storage and switch Storage Sense to On. Once activated, it keeps an eye on your disk space and steps in when storage runs low, making space management practically effortless.
One standout feature of Storage Sense is how it handles cloud files. For instance, if you're using OneDrive, it can automatically change files that haven’t been accessed for 30 days to "online-only" status (this is the default behavior in Windows 11, version 22H2). You can also set it to run on a schedule - daily, weekly, monthly, or only when space is tight. Additionally, you can customize how long files stay in the Recycle Bin or Downloads folder before being deleted, with retention options ranging from 1 to 60 days.
Space Recovery Potential
Storage Sense can free up space by tackling various sources of disk usage, including temporary files, application logs, and files in the Recycle Bin. It also optimizes OneDrive storage. The amount of space you recover depends on how frequently you clean up and how you use cloud storage. If you’re looking for an immediate cleanup, scroll to the bottom of the Storage Sense settings page and click Clean Now.
Technical Skill Required
Using Storage Sense is straightforward and doesn’t require much technical expertise. Its settings are located in the Windows Settings menu, and the options are designed to be user-friendly.
Risk Level
The risk of enabling Storage Sense is minimal. It’s designed to protect active files and respects OneDrive files marked as "Always keep on this device". However, take care with the Downloads folder cleanup setting - if enabled, it could delete files you still need. To avoid this, either move important files elsewhere or adjust the retention period to a longer timeframe.
Automation Capability
Storage Sense operates quietly in the background. According to Microsoft Learn:
"Storage Sense is a Windows feature that helps automatically free up disk space by deleting unnecessary files - like temporary files, items in the recycle bin, and offline content from OneDrive".
Once set up, it runs without requiring further input, provided your device has brief online access for cloud-related cleanups. For IT administrators managing multiple systems, Microsoft highlights:
"Configuring Storage Sense is a low-effort, high-impact way to ensure devices remain performant and up to date".
5. Disable Hibernation
If you're looking for another way to reclaim disk space beyond clearing temporary files or using Storage Sense, disabling hibernation can be a smart move. Hibernation works by saving your system's memory to a file called hiberfil.sys, which can take up 75–100% of your installed RAM. For instance, on a system with 16 GB of RAM, this file could occupy 12–16 GB of storage - quite a chunk, especially on smaller SSDs. To disable hibernation, open a Command Prompt or PowerShell window with admin rights and type:
powercfg.exe /hibernate off
This command deletes the file immediately - no restart required.
Space Recovery Potential
Disabling hibernation can free up a significant amount of space, typically between 8–32 GB, depending on your installed RAM. If you want to keep hibernation but still save some space, you can reduce the file size to 50% of your RAM by running:
powercfg -h -size 50
Technical Skill Required
This process is simple and only requires basic familiarity with command-line tools and admin privileges.
Risk Level
While disabling hibernation is a quick way to free up disk space, it does come with trade-offs. Hibernation is a power-saving feature that can prevent data loss during unexpected power outages. For laptop users, this could be a crucial backup. However, desktop users, who are typically connected to a stable power source, might find this feature less necessary. Ty Sherback from XDA Developers explains:
"Hibernation is a legacy feature that most desktop users simply don't need - and disabling it is one of the easiest ways to free up gigabytes of disk space instantly."
Keep in mind, disabling hibernation also turns off Fast Startup and Hybrid Sleep features.
Automation Capability
If you ever decide to re-enable hibernation, you can do so by running:
powercfg.exe /hibernate on
6. Remove Duplicate Files
Clearing out duplicate files is a smart way to free up disk space. These duplicates - often photos, videos, and documents - can quietly take up gigabytes of storage. They usually pile up from copying, syncing, or downloading files multiple times. Luckily, Windows provides several ways to find and delete them, ranging from simple manual methods to automated tools.
One of the easiest options is Microsoft PC Manager, a free tool from Microsoft. Its "Duplicate files" feature scans your drives and organizes duplicates by file type. You can filter results by media type and sort by file size, making it easier to target the largest duplicates first. The "Smart select" feature is especially handy - it automatically marks newer copies for deletion while keeping the original intact. Keep in mind, though, that PC Manager may bypass the Recycle Bin and permanently delete files, so double-check the list before confirming.
If you’d rather go the manual route, File Explorer works too. Navigate to a folder, switch to "Details" view, and sort by "Name." Files with names like "- Copy" or "(2)" are often duplicates and can be deleted manually. For advanced users, PowerShell offers a more technical option. You can use commands to identify duplicates by file hashes or delete files with specific naming patterns. For instance, this command removes files with "Copy" in their name:
del "* - Copy.png"
Let’s break down some key aspects of duplicate file removal.
Space Recovery Potential
The amount of storage you can reclaim depends on how many duplicates you have. Media files - like photos and videos - are often the biggest offenders, sometimes eating up multiple gigabytes. Sorting duplicates by size in PC Manager ensures you prioritize the largest files for deletion, maximizing your space recovery.
Technical Skill Required
Using tools like File Explorer or Microsoft PC Manager is straightforward and only requires basic navigation skills. On the other hand, PowerShell demands more technical know-how and comes with a higher risk of mistakes if commands aren’t executed carefully.
Risk Level
Deleting duplicates is generally safe, but some programs rely on multiple copies to function correctly. Always review the list of duplicates before deleting, especially when using automated tools. Focus on personal folders like Pictures, Documents, and Videos rather than system or program directories to avoid removing critical files. If you’re deleting manually, don’t forget to empty the Recycle Bin to actually reclaim the space.
Automation Capability
For a faster and more efficient process, tools like Microsoft PC Manager or third-party software such as AOMEI Partition Assistant (highly rated at 4.8/5) can automate the task. These tools identify redundant files while ensuring the originals are preserved, which is especially helpful when dealing with large drives containing thousands of files.
7. Move Large Files to External Storage
Freeing up space on your PC can be as simple as relocating large files to an external drive. Media files like videos, music libraries, high-resolution photos, and gaming collections often take up the most room. For example, AAA games and 4K videos can easily occupy tens of gigabytes, making them ideal candidates for external storage.
Here’s how to do it: Open File Explorer, navigate to your folders, switch to the Details view, and sort by Size to pinpoint the largest files. Once identified, select the files you want to move, use the Copy option to transfer them to your external drive, and, after confirming the transfer, delete the originals from your PC.
To avoid future clutter, you can set new files to save directly to the external drive. Head to Settings > System > Storage > Advanced storage settings > Where new content is saved, and redirect photos, videos, documents, and music to the external drive. This step is especially handy if you frequently download large files or work with media projects.
One critical tip: Always use the Eject option in the system tray before unplugging your external drive. Skipping this step could lead to file corruption or data loss. Additionally, if you’re moving files larger than 4GB, ensure your external drive is formatted as NTFS or exFAT, since the older FAT32 format doesn’t support files of that size.
Space Recovery Potential
Relocating personal media files and gaming libraries can free up tens to hundreds of gigabytes. Since these types of files are often the largest on consumer PCs, this method can reclaim a significant amount of storage.
Technical Skill Required
You don’t need advanced skills for this task. It involves basic operations in File Explorer and a quick adjustment in Windows Settings to change default save locations.
Risk Level
The risk is minimal if you follow the proper steps. Always safely eject your drive before unplugging it. However, keep in mind that external drives can fail or get misplaced, so it’s wise to back up any critical files.
Automation Capability
While moving existing files is a manual process, you can automate future file management by configuring Windows to save new content directly to your external drive. This setup reduces the need for frequent manual transfers and keeps your internal storage clear.
Comparison Table
Choosing the right method to free up disk space depends on your familiarity with Windows, how much space you need to recover, and whether you prefer a one-time solution or ongoing maintenance. The table below provides a quick overview of each method, summarizing their space recovery potential, technical skill required, risk level, and whether they offer automation. This serves as a handy reference based on the detailed instructions shared earlier.
| Method | Space Recovery Potential | Technical Skill Required | Risk Level | Automation Capability |
|---|---|---|---|---|
| 1. Disk Cleanup | High (over 10GB after updates) | Low | Low | Manual |
| 2. Uninstall Apps | High (depends on app size) | Low | Low | Manual |
| 3. Delete Temp Files | Moderate (GBs of cache) | Basic | Low/Moderate | Manual |
| 4. Storage Sense | Moderate to High | Low | Low | Fully Automated |
| 5. Disable Hibernation | Moderate (roughly the size of RAM) | Basic (CMD) | Moderate | Single execution |
| 6. Remove Duplicates | Variable | Medium | Moderate | Semi-automated |
| 7. External Storage | Very High (unlimited) | Low | Low | Manual |
Among these options, Storage Sense stands out as the only fully automated method, running in the background once set up. If you're looking for the most space recovery, transferring files to external storage offers virtually unlimited potential. Meanwhile, Disk Cleanup is a fast and effective way to reclaim significant space after major Windows updates.
For those less familiar with technical processes, methods like Disk Cleanup, uninstalling apps, and Storage Sense are safe and low-risk options. Beginners will see quick results by starting with Disk Cleanup or removing unneeded apps. If you prefer a "set it and forget it" approach, enabling Storage Sense for automatic cleanups is a great choice. Advanced users, on the other hand, may want to dive deeper by disabling hibernation or removing duplicate files to maximize space recovery. Combining multiple methods - like running Disk Cleanup first and then configuring Storage Sense - can also be an effective strategy for ongoing maintenance.
Next, we'll bring everything together with actionable recommendations in the Conclusion.
Conclusion
Keeping your Windows PC's disk space in check is essential for maintaining its performance. The seven methods discussed - from using Disk Cleanup to transferring large files to external drives - address specific types of storage clutter effectively.
Having enough free space not only prevents your system from slowing down but also ensures smooth installation of critical security updates. It also helps avoid crashes caused by accumulating files like games, photos, and temporary data.
To recap, start with the easiest fixes: Disk Cleanup can recover over 10GB after major updates, and uninstalling unused apps is a quick way to free up space. Automating cleanup with Storage Sense is another smart move. For those comfortable with more advanced techniques, disabling hibernation and removing duplicate files can help reclaim even more storage.
For additional tips on optimizing your system, check out Supportia.
FAQs
How much free space should I keep on my C: drive?
Maintaining 10–20% free space on your C: drive is a good practice. This extra space allows your system to operate efficiently, handle updates, and manage temporary files without hiccups. Without enough free space, your computer might experience slower performance or other issues.
Will Storage Sense delete files I still need?
Storage Sense in Windows helps free up disk space by clearing out files that are no longer needed, such as temporary files, system cache, or items sitting in the Recycle Bin. However, there's a catch: it might delete files you still want if they're marked as unnecessary. To prevent losing something important, take a moment to review the cleanup suggestions before approving any deletions.
What’s the safest way to free space without breaking Windows?
The best way to clear up disk space on Windows is by using the tools that come with the system, such as File Explorer and Disk Cleanup, to get rid of temporary and unneeded files. Another option is enabling Storage Sense, which can automate this process for you. Be cautious and avoid manually deleting system or program files, as this might create problems. For ongoing issues, consider following the official instructions to reset or reinstall Windows.