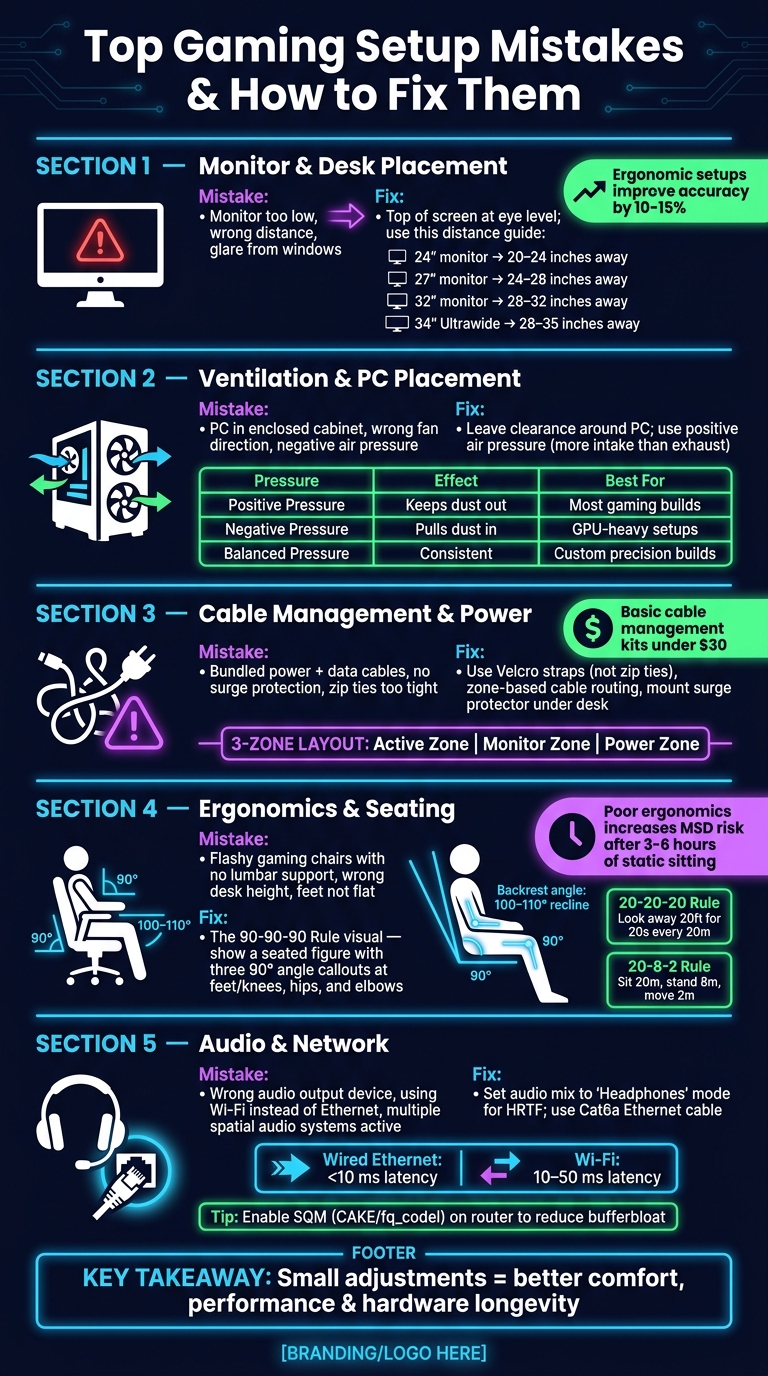
Most gaming setups fail due to simple, avoidable mistakes. Poor monitor placement, bad airflow, messy cables, and uncomfortable chairs can ruin your gaming experience and even harm your health. Here's what you need to know:
- Monitor Mistakes: A screen set too low or far causes neck strain and eye fatigue. Keep the top of your monitor at eye level and adjust distance based on size (e.g., 24" = 20–24 inches).
- Ventilation Issues: PCs placed in tight spaces or with improper fan setups overheat, leading to slower performance and hardware damage. Ensure proper airflow with intake and exhaust fans.
- Cable Clutter: Tangled cables block airflow, cause signal interference, and create safety risks. Use Velcro straps, cable trays, and surge protectors to organize and protect your setup.
- Ergonomics: Flashy chairs without lumbar support or desks at the wrong height lead to back pain and poor posture. Follow the 90-90-90 rule: feet flat, knees at 90°, and elbows level with your desk.
- Audio & Network Errors: Incorrect audio settings or relying on Wi-Fi instead of Ethernet can hurt performance. Use wired connections and configure sound settings for clarity.
Key takeaway: Small adjustments - like fixing monitor height, improving airflow, and organizing cables - can dramatically improve comfort, performance, and hardware longevity. Focus on these areas to create a better gaming setup.
Gaming Setup Mistakes: Quick Fix Checklist for Better Performance & Comfort
The Biggest PC Gaming Mistakes You Need To STOP Making!
sbb-itb-dc5b06c
Desk and Monitor Placement Errors
Where you position your desk and monitor can have a bigger impact on your gaming experience than you might think. Poor placement isn't just about aesthetics - it can actually lead to long-term posture problems.
Common Layout Mistakes
One of the most frequent errors is setting the monitor too low, which forces you to tilt your head downward. This unnatural angle puts extra strain on your neck. Both the height and distance of your monitor are crucial - check out the table below for recommended viewing distances. Another common issue is glare. If your monitor is directly in front of a window or under harsh overhead lighting, you'll find yourself leaning or squinting to see clearly. For those using dual monitors, arranging them in a wide "V" shape can lead to constant neck rotation, which only makes things worse.
How Poor Placement Affects You
These setup mistakes can lead to real physical discomfort. Neck strain, eye fatigue, and headaches are common complaints after hours of gaming. Beyond health concerns, these issues can also hurt your performance. Physical discomfort slows reaction time and reduces precision. Studies even show that gamers with ergonomic setups perform 10–15% better on accuracy tasks compared to those with poor setups. Adjusting your monitor height alone can cut the risk of gaming-related injuries by 30%.
"A well-set up gaming monitor can greatly improve your gaming experience." - Dr. Thomas Bushur, D.C., Back In A Flash Chiropractor & Massage
Recognizing these issues is the first step toward making effective adjustments.
How to Fix Your Desk and Monitor Setup
Start by addressing monitor height: the top of the screen (or top bezel) should align with or sit just below eye level. This keeps your neck in a neutral, comfortable position. Proper viewing distance depends on your screen size:
| Monitor Size | Recommended Distance | Why It Matters |
|---|---|---|
| 24" | 20–24 inches | Allows you to see the full screen without strain |
| 27" | 24–28 inches | Maintains a comfortable field of view |
| 32" | 28–32 inches | Minimizes neck strain |
| 34" Ultrawide | 28–35 inches | Provides immersion without being overwhelming |
Using a gas-spring monitor arm like the Ergotron HX can make it easier to adjust your monitor's height, depth, and tilt, which is especially helpful if you alternate between sitting and standing. To minimize glare, position your monitor at a 90-degree angle to windows, and consider using a monitor light bar like the BenQ ScreenBar Halo (~$160) for bias lighting that reduces eye strain without creating reflections. If you're working with a dual-monitor setup, keep your primary screen directly in front of you and angle the secondary monitor 30–45 degrees to the side, rather than spreading them out evenly.
Poor Ventilation and PC Placement
Where you place your PC can directly affect its performance and lifespan. Let’s break down common ventilation mistakes and how to fix them.
Common Ventilation Mistakes
A frequent issue is placing your PC in a closed desk cabinet or too close to a wall. This setup traps hot air and recirculates it, causing your PC's internal temperatures to rise quickly. Another mistake is improper fan installation - case fans should pull cool air in from the front and bottom while pushing warm air out through the rear and top. Misaligned fans disrupt this airflow pattern.
Messy cables inside your case can also block airflow, making it harder for components like your CPU or GPU to stay cool.
"Cables, cramped GPU spacing, and poorly placed fans all break that tunnel." - Digital Trends
Another problem is negative air pressure, where more air is exhausted than pulled in. This imbalance draws unfiltered, dusty air through gaps in the case, which can lead to buildup over time.
What Happens When Airflow Is Poor
Poor airflow can lead to thermal throttling, where the CPU or GPU slows down to avoid overheating. Over time, consistently high temperatures can damage components and reduce their lifespan.
"How you move air through your case can dramatically impact your system's thermals, performance, acoustics, and even lifespan." - Kunal Khullar, Former Computing Writer, Digital Trends
Restricted airflow also forces fans to work harder, increasing noise levels and putting extra strain on the cooling system - especially during demanding tasks like gaming.
How to Improve Airflow and PC Placement
Start by ensuring your PC has a few inches of clearance around it, particularly near its vents. If your PC is currently enclosed, move it to an open space. Next, check your fan setup. At a minimum, you’ll need one intake fan and one exhaust fan to create a basic airflow system.
For optimal results, aim for positive air pressure - slightly more air coming in than going out. This setup helps push dust out through unfiltered gaps. Here’s a quick comparison of pressure types:
| Pressure Type | Dust Impact | Best For |
|---|---|---|
| Positive Pressure | Keeps dust out of unfiltered gaps | Most gaming builds |
| Negative Pressure | Pulls dust through cracks and gaps | GPU-heavy setups |
| Balanced Pressure | Consistent but harder to maintain | Custom precision builds |
Follow natural airflow patterns when placing fans: position intake fans at the front or bottom and exhaust fans at the rear or top. To monitor your system’s temperature, use tools like HWiNFO64 or MSI Afterburner for real-time readings. You can also use Fan Control, an open-source utility, to set custom fan curves - this allows fans to stay quiet during light use and ramp up only when needed.
Finally, don’t forget regular maintenance. Clean your dust filters every 1–2 months and replace your CPU’s thermal paste every 2–3 years to maintain efficient cooling.
"Case airflow is one of the few areas in PC building where you can make a noticeable impact without spending a whole lot of money." - Digital Trends
Cable Management and Power Setup Mistakes
Messy cables aren’t just an eyesore - they can harm your hardware and even create safety hazards. Once your PC's ventilation is sorted, it’s time to focus on managing cables and power for both safety and performance.
Common Cable and Power Problems
A frequent mistake is bundling power and data cables together. This can lead to electromagnetic interference, which disrupts signals. High-bandwidth connections, like those used for 8K or high-refresh-rate displays in 2026, are especially vulnerable to such interference.
Another issue is relying on basic power strips without surge protection. Voltage spikes caused by storms or grid fluctuations can damage key components like your GPU, motherboard, or monitor. Overloading a single strip with multiple devices - like your PC, monitors, speakers, and console - can also pose a fire risk.
"Proper cable management isn't just about aesthetics. It improves airflow around your gear, makes cleaning easier, and prevents those frustrating moments when you accidentally yank out your headset mid-clutch play." - TieredUp Tech
Risks of Ignoring Cable and Power Management
Leaving cables on the floor can lead to them being pinched by chair wheels or accidentally pulled, which stresses ports and connectors. Over time, this stress can result in internal wire damage or port failures. Additionally, tangled cables tend to collect dust, which can trap heat and further stress components already running hot during intense gaming sessions.
Using zip ties too tightly is another common problem. Over-tightening can damage cable insulation, a mistake that often goes unnoticed until issues arise. As Caitlin Agnew-Francis, Commercial Sales Manager at Desky, points out: "Over-tightening cables is one of the management mistakes that can quietly damage the setup over time". Velcro straps are a better option since they are adjustable and reusable, reducing the risk of cutting into cable insulation.
To avoid these problems, consider a zone-based approach to organizing your cables.
How to Organize Cables and Plan Your Power Setup
Divide your workspace into three zones:
- Active Zone: Includes devices like your mouse, keyboard, and headset.
- Monitor Zone: Focuses on display cables.
- Power Zone: Houses your surge protector and power adapters under the desk.
Separating these zones helps minimize interference by keeping high-voltage power cables away from sensitive data lines.
Mount a surge protector under your desk to keep connections tidy and off the floor. Use a cable tray to route power cables along one side and data cables along the other. Opt for Velcro straps instead of zip ties for bundling cables - they’re easier to adjust and won’t damage insulation. Basic cable management kits with Velcro straps and clips are usually available for under $30, while sleeved PSU extension kits from brands like Asiahorse cost between $25.49 and $37.99.
Label both ends of your cables with painter's tape to simplify hardware changes. Make it a habit to check your setup every one to three months to tighten loose bundles and clear dust from trays before minor issues turn into bigger problems.
| Tool | Primary Use | Benefit |
|---|---|---|
| Velcro Straps | Bundling cables | Reusable; won’t damage insulation |
| Cable Tray | Under-desk routing | Keeps power strips and adapters off-floor |
| Cable Sleeves | Grouping visible runs | Creates a neat, unified appearance |
| Surge Protector | Power supply protection | Guards against voltage spikes |
| Cable Clips | Guiding single cords | Prevents cables from slipping off edges |
Ergonomics and Seating Mistakes
Once you’ve sorted out your cables and power setup, it’s time to focus on something just as crucial: your seating arrangement. A proper setup isn’t just about comfort - it’s key to maintaining focus and performing at your best during long gaming sessions. A poor seating setup not only leads to discomfort but can also hurt your reaction time and overall gaming experience.
Common Ergonomic Mistakes
One of the biggest mistakes people make is picking a chair based on appearance rather than functionality. Many "gaming chairs" feature flashy bucket-seat designs that might look cool but often lack essentials like adjustable lumbar support or breathable materials. Ironically, a well-designed ergonomic office chair priced at $300 often provides better support than a $500 gaming chair focused on aesthetics.
Another common issue is improper desk height. Many gamers set their desk height to match their chair’s armrests instead of aligning it with their elbows. This misalignment can lead to awkward wrist positioning and strain. Additionally, incorrect leg positioning - like feet not being flat on the floor - can restrict circulation during extended gaming sessions.
How Poor Ergonomics Affects Your Health
Spending three to six hours in a static, uncomfortable position can significantly increase the risk of musculoskeletal disorders (MSDs). For example, resting bent wrists flat on the desk instead of keeping them in a neutral position can strain tendons over time, potentially leading to Carpal Tunnel Syndrome. Similarly, a poorly reclined chair can gradually cause back strain, though many gamers don’t notice the connection until the discomfort becomes severe.
Ergonomics also directly impact performance. Gamers with ergonomically optimized setups perform 10–15% better on accuracy tasks and experience less fatigue during sessions longer than three hours. Poor posture can also compress the diaphragm, leading to shallow breathing, which reduces oxygen flow to the brain.
"Poor posture also compresses your diaphragm. Shallow breathing reduces oxygen to your brain. Your decision-making suffers when you're not getting enough air." - Bestier.net
To avoid these issues, making targeted ergonomic adjustments is essential.
How to Set Up an Ergonomic Gaming Station
A great starting point is the 90-90-90 rule: feet flat on the floor, knees bent at 90°, hips at 90°, and elbows at 90° with forearms parallel to the desk. Adjust your chair so your feet are flat and your elbows form a 90° angle, then set your desk height so your forearms rest comfortably on the surface. If your desk isn’t adjustable, using a footrest can help maintain proper leg positioning without sacrificing arm height.
For your chair, aim for a backrest reclined between 100° and 110°. This angle reduces spinal disc pressure and provides a comfortable hip angle. Make sure the lumbar support fits snugly into the natural curve of your lower back, offering consistent, gentle support.
"The ability to dial in your exact sitting height is the real value [of standing desks] for gaming." - Tom Terhune, Gaming Hardware Editor, GamerHardware.org
To avoid staying in a static position for too long, follow these simple rules:
- The 20-20-20 rule: Every 20 minutes, look at something 20 feet away for 20 seconds. This not only gives your eyes a break but also encourages a quick posture check.
- The 20-8-2 rule: For every 30 minutes of gaming, sit for 20 minutes, stand for 8 minutes, and move around for 2 minutes.
These small adjustments can make a big difference over the course of a long gaming session.
| Adjustment | Ergonomic Goal | Why It Matters |
|---|---|---|
| Seat Height | Feet flat, knees at ~90° | Improves circulation and leg support |
| Backrest Angle | 100–110° recline | Reduces spinal disc pressure |
| Monitor Height | Top of screen at eye level | Prevents neck strain and forward posture |
| Armrests | Elbows at 90°, shoulders relaxed | Reduces shoulder tension |
| Seat Depth | 2–3 finger gap behind knees | Prevents pressure on blood vessels |
Audio and Network Setup Mistakes
Poor audio and network setups can seriously affect your gaming experience. These issues don’t just break immersion - they can directly impact your performance.
Common Audio Setup Mistakes
One frequent problem is Windows defaulting to the wrong audio output device after updates. Driver changes or new peripheral connections often leave players with muted or distorted audio, and many don’t realize it until they’re mid-game.
Another common issue lies in in-game audio mix settings. Many players unknowingly use "Home Theater" or "Stereo" modes while wearing headphones. This reduces directional accuracy because the game isn’t using HRTF (Head-Related Transfer Function), which simulates sound direction. Always set the mix to "Headphones" when using a headset for better spatial awareness.
Using multiple spatial audio systems at once is another pitfall. For example, enabling both your headset’s 7.1 surround sound software and Dolby Atmos at the system level can cause phase cancellation, leading to distorted and unclear audio. To fix this, stick to one spatial audio system and disable the other.
Common Network Setup Mistakes
Network errors can be just as disruptive as audio problems. Relying on Wi-Fi instead of a wired connection is a common mistake. Even with advanced Wi-Fi 6E hardware, wireless connections are vulnerable to interference from walls, other devices, and neighboring networks. Wired Ethernet, on the other hand, offers consistent latency under 10 ms, while Wi-Fi latency can vary from 10–50 ms depending on conditions.
Router placement also plays a crucial role. Stashing your router inside a cabinet, near a microwave, or behind metal surfaces weakens the signal. For stable wireless gaming, ensure your signal strength remains above –65 dBm. Some gamers try to compensate for poor placement by increasing channel width (e.g., to 160 MHz), but this can lead to more interference in crowded environments.
"A clean channel beats a wide one, since fewer collisions mean steadier delivery even at slightly lower peak speed." - PulseGeek
How to Fix Your Audio and Network Setup
Here’s how to address these audio and network issues to improve your gaming performance:
Audio fixes:
- In Windows Sound Settings, select the correct output device and set the sample rate to 24-bit, 48000 Hz to avoid crackling caused by mismatched sample rates.
- Disable "Allow applications to take exclusive control of this device" in Windows Sound properties. This prevents apps like Discord from interrupting your audio during gameplay.
- Adjust your EQ settings: boost the 2,000–6,000 Hz range by 2–4 dB for clearer sounds like footsteps and gun reloads, and reduce the 100–500 Hz range to cut unnecessary bass.
- For spatial audio, consider using Windows Sonic (free on Windows 10/11) or paid options like Dolby Atmos and DTS Headphone:X, which cost about $15 each.
Network fixes:
- Use a Cat6a Ethernet cable for a direct connection to your router. If Ethernet isn’t an option, MoCA adapters (which use coaxial cables) provide more stability than powerline adapters.
- Enable SQM (Smart Queue Management) in your router’s firmware, specifically the CAKE or fq_codel algorithm, to reduce latency caused by bufferbloat during heavy internet usage.
"In 2026 SQM is the single best defense against bufferbloat. If your router supports CAKE/fq_codel, enable it and tune upload cap first." - Gamebracelet
- Set a static IP or configure a DHCP reservation for your gaming PC or console to ensure QoS (Quality of Service) rules are consistently applied.
- Limit your upload speed to 85–95% of your measured capacity to prevent your ISP’s modem from bypassing your router’s queue management.
Conclusion: Steps to a Better Gaming Setup
To recap, improving your gaming setup doesn’t require a massive overhaul or hefty budget. Most common issues - like a monitor set too low, poor cable organization, cramped PC placement, uncomfortable seating, or neglected audio and network settings - can be addressed with simple adjustments. These small tweaks can have a big impact on both your gaming performance and overall comfort.
Making these changes not only enhances your gaming experience but also helps prevent long-term health problems such as neck strain, wrist pain, and eye fatigue. For example, positioning your monitor so the top aligns with eye level or switching from Wi-Fi to a wired Ethernet connection can make a noticeable difference in both comfort and performance.
"The best long-session setup is not the most expensive one. It is the one that removes the most points of physical strain per hour played." - Marcus Reid, Senior SEO Editor, gamesconsole.link
Consistency is key. Regular maintenance of your gear and taking short breaks - like standing for five minutes every 45–60 minutes - can go a long way in keeping you comfortable and focused.
Whether you're gaming casually or competitively, the goal is to create a setup that minimizes distractions and maximizes your focus. Start with the easiest fix for your setup, then tackle the rest, such as adjusting your monitor, improving ventilation, organizing cables, upgrading your chair, or fine-tuning audio and network settings. Each improvement builds on the last, creating a better overall experience. Take the first step today and watch your gaming setup transform.
FAQs
What’s the fastest way to identify the biggest problem in my setup?
The fastest way to spot problems in your gaming setup is by examining key areas like cable management, ventilation, and monitor placement. A quick visual inspection combined with some basic tests can reveal issues like tangled cables, inadequate airflow, or monitors that are poorly positioned. These factors can significantly affect both performance and comfort, so addressing them can make a noticeable difference.
How can I improve cooling without buying new PC parts?
To get better cooling without spending on new parts, concentrate on airflow optimization and cable management. Tidy up your cables to avoid blocking airflow and make sure the system has proper ventilation. You can also tweak fan placement and balance the case's air pressure to improve cooling efficiency. These simple adjustments can help lower internal temperatures, prevent overheating, and boost performance - all without spending a dime.
What’s the most budget-friendly upgrade for comfort during long sessions?
The easiest and budget-friendly way to make long gaming sessions more comfortable is to focus on your chair's support and overall ergonomics. Using an ergonomic chair is a great start, but you can also adjust your desk and monitor height to minimize strain. These straightforward tweaks can significantly improve your comfort without breaking the bank.